June 28, 2012
How To Develop A First-Rate Requirements Template
One of the biggest problems with requirements is that everyone writes them in different ways, which obviously leads to different interpretations too. If your requirements template is unclear, it’s almost inevitable that your developers will omit information that someone else needs to understand the requirement correctly.
A good template needs to have a few specific sub-headings that you can view as a checklist to ensure that everything important is included in the requirement. This article will provide you with a number of key ingredients for developing a first-rate requirements template. If you are lucky to have a requirements management tool, you can adjust your tool’s templates with the advice contained in this article.
Templates for requirements versus templates for requirements documents
This article talks about templates for individual requirements, not templates for the actual requirements specification that contains a set of requirements. You can download a requirements specification template at www.reqtest.com if you’re looking for one.
Different requirements templates are usually needed in different phases of requirements management. When you work with requirements at a high level, you can get by with a requirements template with just a few fields; but in more detailed requirements work, you’ll need a requirements template that makes room for additional information. Which model you should use also depends on other factors, such as the development methodology and what resources you have available.
User stories as a template for requirements
If you use agile methodologies in your work, you’ve probably already had experience describing requirements in the form of user stories. You document user stories in a structured way, such as:
As a [role], I want to [goal] so that I can [reason].
When you fill in the template, the result looks like this:
As a project manager, I want to see the status of all of my development team’s tasks, so that I can determine whether the projects will be completed on time.
You can say that a user story consists of three key fields that describe what needs to be done, who needs it to be done, and why they need it done.
Recommended additions to the requirements template
Title
A short description of the requirement. The title should clearly explain what the requirement is about, even though the reader will need to read through the entire requirement to understand the detail. Examples include “Create billing documents” or “Notify by e-mail”. Requirements management tools list requirements by title, so you’d better make sure they are clear and concise. Similarly, if you work using Agile methods, you usually write titles on yellow sticky notes you put on the Scrum board, so you should give the requirement a good title right from the start.
Description
A more detailed description of the requirement. It’s a good idea to write the description in the form of a user story; if needed, you can make the description into a longer paragraph.
ID Number
You give each requirement a unique number since this makes it more difficult to confuse one requirement with another. The ID is usually a serial number, with each requirement consecutively numbered 1, 2, 3, and so on. Each ID number must only be used once. The IDs help you create cross-references between requirements, for example when you want to indicate that a requirement is a sub-requirement that belongs to a higher-level requirement.
Source
The source is the origin of the requirement, such as a person, department, or legal document. If the requirement came from an administrator in a department, you might indicate the name or title/position of that individual, or the department they represent. Knowing the source allows the reader to ask questions. The author of the requirement is usually not the source.
Author
The (first and last) name of the person who wrote the requirement in the tool. People reading the requirement(s) may want to contact the author to ask questions or get clarification.
Motivation
The explanation for why the requirement exists; examples may include an ROI calculation, a description of why the existing functionality doesn’t meet current needs, the time that could be saved by using a new system, etc. If you use a user story template, the rationale is included in the story and need not be added as an additional field.
Status
Status shows where the requirement currently stands. Examples of status include proposed, approved, under development, in testing, implemented, and deferred. You can even indicate that the requirement is a future requirement that isn’t relevant to the current release, but will be implemented later.
Priority
The urgency and importance of the requirement. For example, you might use the MoSCoW scale (Must, Should, Could, or Won’t be implemented).
Dependencies
Description of the relationships between the current requirement and other ones. Requirements are often dependent on other requirements. A requirement can consist of other requirements, be a sub-requirement under a different requirement, or the reader may simply need to read a different requirement to understand the current one.
Sample requirements in requirements templates
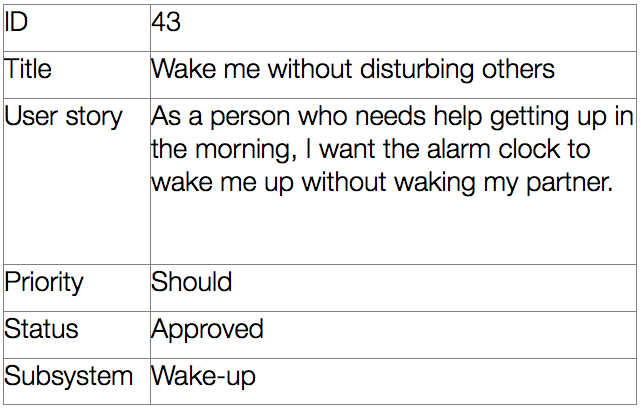
Here is an example of a user story with a few more headers than you’d usually find:

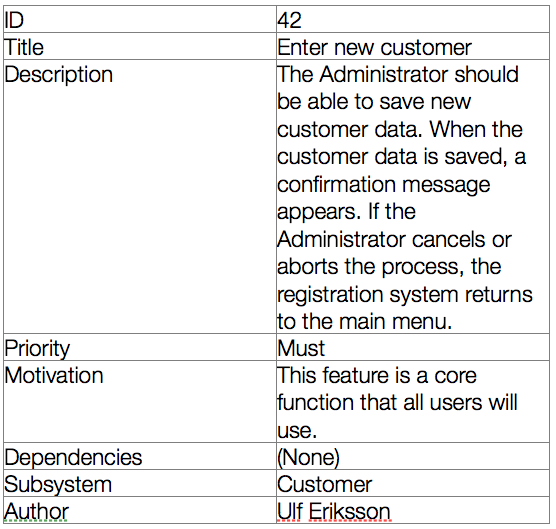
The below example is a traditional requirements template. Note the motivation field and that prioritization follows the MoSCoW terminology.

Summary
You’ll have an easier time writing high quality requirements if you have a good requirements template that includes some of the important headings described above.
Of course, you can’t get by with just a good template; you need skills and proper techniques for gathering requirements based on stakeholder needs, as well as techniques for reviewing the requirements.
To get started with your requirements template, choose one or more of the headings recommended here. While they’re all advantageous in one way or another, don’t cram them all into your template, or you’ll never get requirements management off the ground.
Instead of making specific sub-headings for every piece of information, you could write that information elsewhere in the requirement. For example, you might indicate the source in the requirement description instead of inserting it as a separate heading. While having a lot of headings reduces the risk that the authors neglect to enter certain details, too many headings bog down the process and make the requirements more difficult to produce and use.
Suggestions for further reading
- Read how ReQtest handles requirements and the features available here – https://reqtest.com/requirements-blog/requirements-analysis/
- Read the article “Identifying stakeholders” to learn how to find good sources of requirements and details; https://reqtest.com/requirements-blog/how-to-identify-stakeholders/
- Part 2 of this article includes more helpful headers for your requirements template.
Share article