July 23, 2014
Doing risk-based testing in ReQtest
Risk based testing is a method of prioritising testing in such a way that makes it easier to determine which requirements should be tested first.
Because a normal development team is usually working under some constraint or other. We cannot assume that we have enough time, money and other resources, like attention, available to test every aspect of the system equally and in the same amount of depth.
Deadlines have to be met and in this scenario a testing team has to learn how to conserve resources and channel them primarily to the tests that require them most.
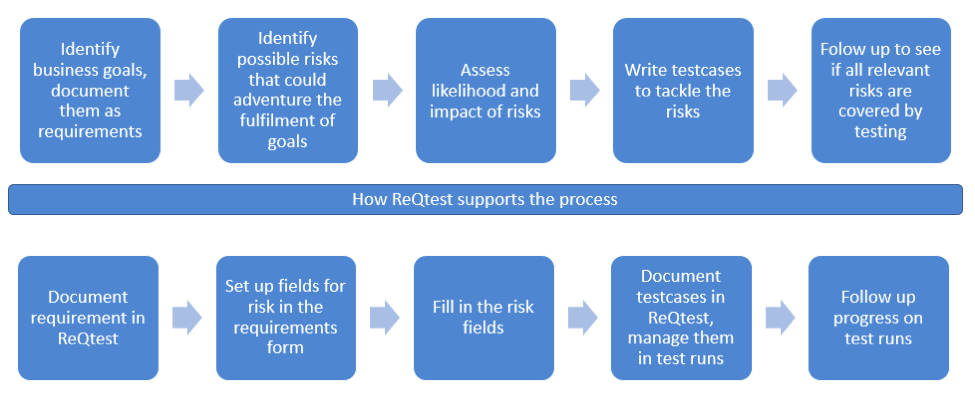
Figure 1. A flowchart showing how ReQtest supports risk based testing
In risk based testing we prioritise the different aspects of the system according to their level of risk.
I will explain further how to determine risk levels in the next section, however for now let me explain what ‘risk’ consists of.
A high risk, in this case, is correlated to the possibility that when some aspect of the system doesn’t function properly it will have a widespread damaging effect on the system.
A low risk, on the other hand, means that when some aspect goes south, its impact on the system will be more contained and the effects less disruptive.
After identifying the risk level, tests are planned in such a way that the riskiest elements in the system are tested first and the less risky ones later. This ensures that any bugs with a potentially disastrous effect are caught early on and resolved while resources are still plentiful.
As figure 1 illustrates, ReQtest can support risk-based testing, and later on in this piece I will demonstrate how you can use this tool to quickly and easily carry out risk-based testing.
Identify the risks
So how do you assess risk?
A common way to identify risks is my getting your team all together and asking each individual to write down all the possible risks they can think on sticky notes.
To make the task easier you could tell your team members to think of risks as grouped into different categories, for example, objects, functions, requirements and test cases.
This is a very simple method for identifying risks, and you can find a wealth of information about other techniques for product risk analysis (PRA) on the internet.
Once your team has identified a number of risks, it’s time to give them a risk level score which will eventually help us to rank them according to risk.
We at ReQtest often use a simplified version of the risk level matrix for establishing the risk level of every element reported by the group.
This approach simply involves multiplying the consequences if something goes wrong by the likelihood that it will go wrong. For both variables, you can use a three or five-point scale to determine their relative magnitude.
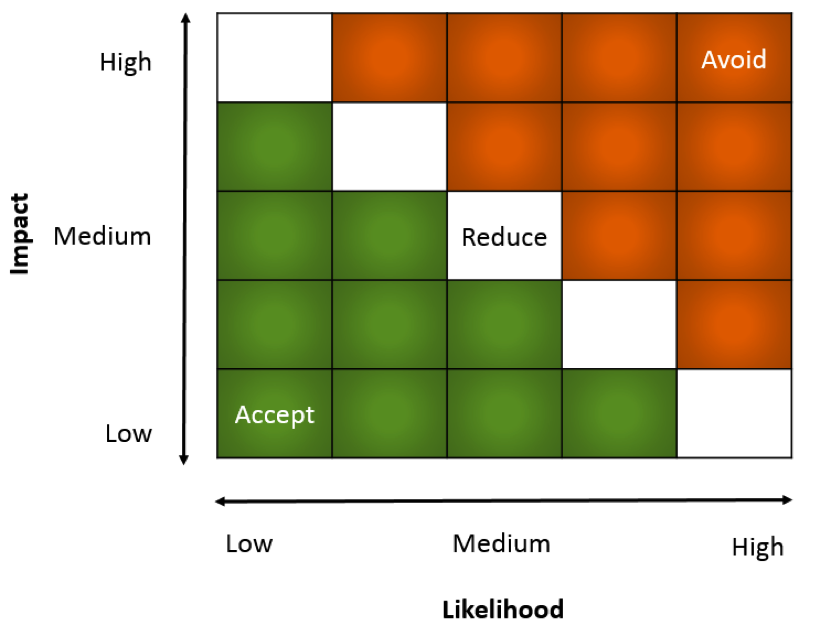
Figure 2. Risk level matrix
In figure 2 above, we constructed a risk level matrix based on a 5-point scale which allows for better discrimination of risk levels and makes it easier to rank the requirements which will be subsequently tested.
Each square in the matrix corresponds to a particular score and the table is divided into three areas which corresponds to different levels of risk and the team’s appropriate response.
- Elements scoring 10 to 25 points during risk assessment have to be acted upon immediately in order to avoid the risk.
- For elements scoring 5 to 9 points during risk assessment, steps should be taken to reduce the risk, but only after the higher-scoring elements are addressed.
- Elements scoring 1 to 4 points during risk assessment are deemed to be acceptable and can be safely ignored.
Example:
Risk: That the system is slow.
Likelihood: 3
Impact: 3
Risk Level: 3 x 3 = 9 points = reduce the risk
The risk level gives us a good indication of the elements that need to be tested more aggressively and what parts can be tested less so. Testers should take this into account when determining which test cases to carry out first.
It is better to handle large risks as early as possible, so that you don’t postpone great risks ahead, when time is tight, resources scarce and patience levels running low.
Create test cases for each risk identified
All the information gathered so far can be inputted in ReQtest using customised fields to enter details for likelihood, impact and risk level.
This layout can also be made into a template to can be easily shared for requirements and test cases. You can also add fields for bug reports and test runs if you would like to.
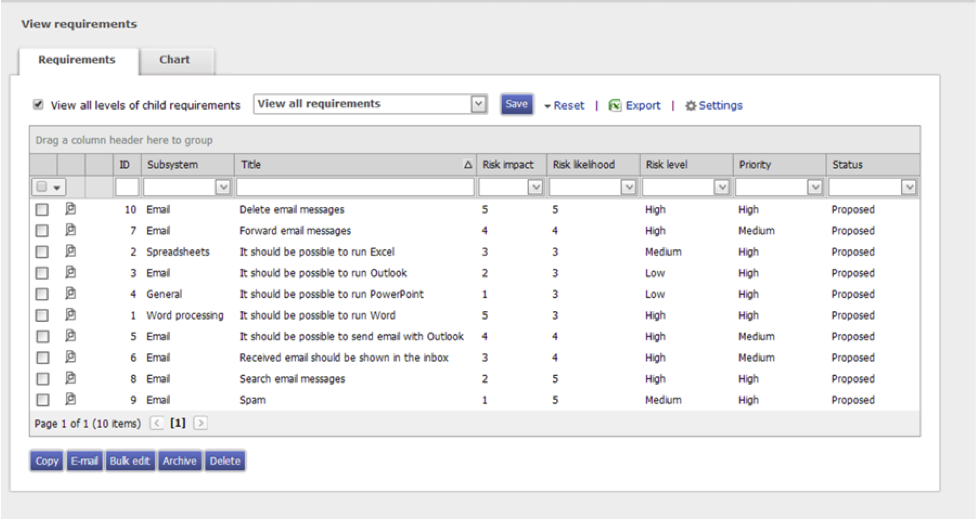
Figure 3. Added columns for risk assessment
You can go through the project’s requirements in ReQtest and assign to each likelihood, impact and risk levels as shown in figure 3.
When you are done, you can automatically create a ranked list of requirements that can be used to plan during the testing process.
Run risk-based tests
Now is the time to run your first batch risk-based tests. As always, using ReQtest gives you the advantage of having several powerful features for quickly filtering the results and quickly find the test cases with the highest risk level (Figure 4).
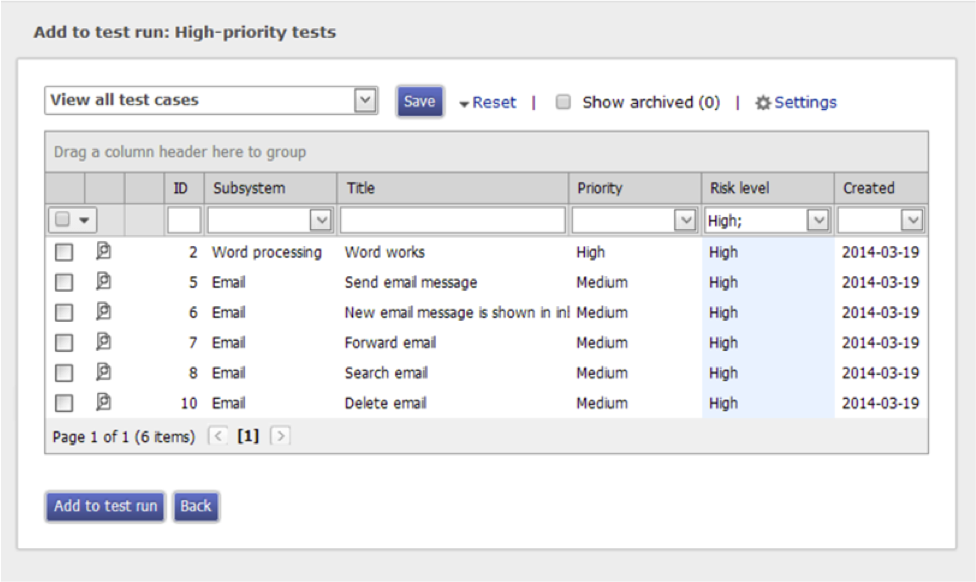
Figure 4. Creating a test run with high-priority tests
Follow up test results and repeat process
If you create one test run with test cases that test the highest risk and another test run testing risks with medium risk you can easily follow up on test cases based on the risks.
Naturally, the test cases with the highest risk level are tested before the test cases with medium to low risk levels.
This method of conducting tests helps testers work in a way which is more in sync with the overall team’s needs, especially with respect to the resources that are available to the team.
Share article