September 14, 2015
Use Story Mapping to Power up Your User Stories
User stories are an incredibly useful way to build a better product backlog, one that is user-centric and describes software requirements in a practical, actionable way.
But user stories on their own do not reveal the whole picture.
In fact, author Jeff Patton calls a backlog that’s simply a collection of user stories “flat” and thus insufficient to help you identify any missing link. Individual user stories are great for providing you with content to ponder upon, however they lack a unifying context which can clue you in on the larger journey the user goes through from the moment that load an app until they reach their final goal.
If there was a way you could visualise the journey as a whole, you’d be able to spot the uncharted territories, those aspects of the user experience which you forgot to include in the original backlog.
This is where story maps come in useful. In this article, I’ll give you a quick introduction to story mapping and how you can use it to take your user stories to the next level and string them together in one coherent and complete user narrative.
What’s a Story Map?
Story mapping has been around for a long time, but one man, Jeff Patton, has perhaps contributed most of all through his writings over the span of a decade in developing this agile tool as a way to extend the usefulness of user stories.
In a nutshell, story mapping is a simple, card-based planning tool that allows a team to visualise the project in its entirety and quickly ascertain whether all of its components are in place and on track.
In Patton’s own words: “Story mapping keeps us focused on users and their experience, and the result is a better conversation, and ultimately a better product.”
Agile Alliances defines story mapping as “a more structured approach to release planning… consisting of ordering user stories along two independent dimensions.”
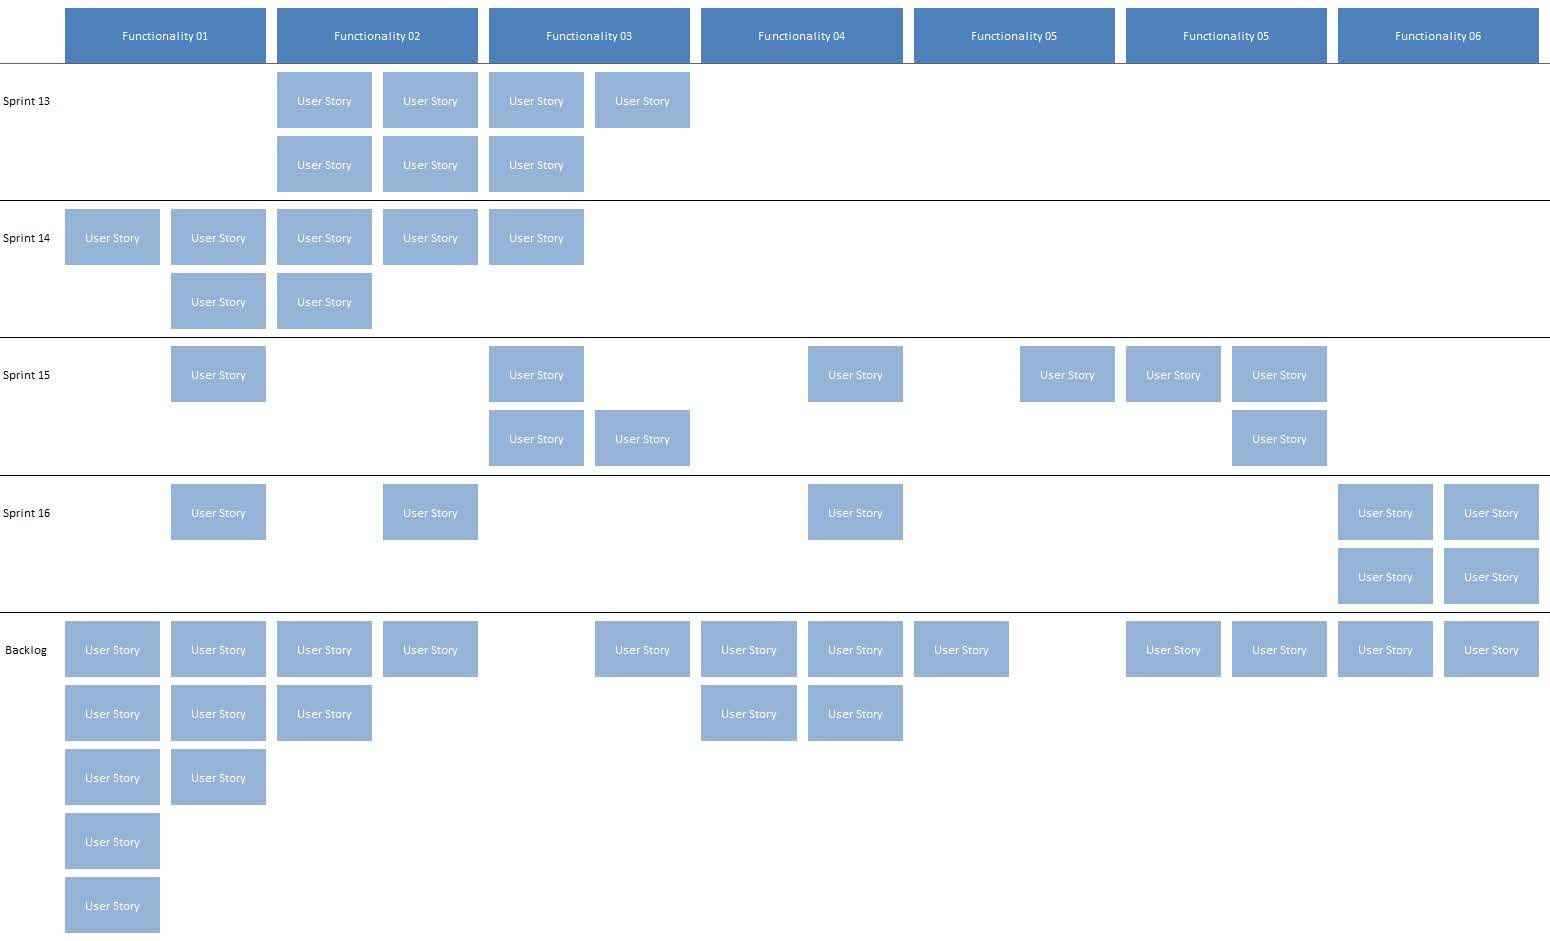
These two independent dimensions are usage/time along the horizontal axis and priority along the vertical axis. This grid serves as a visual representation of the team’s workflow, breaking down the project into smaller tasks that are group together according to the type of activity.
Benefits of Story Mapping
Story maps have a lot of benefits to offer Scrum teams that use them when planning their work. A well-prepared story map can:
- Help the team in visualising all the tasks that make up a project, pinpointing dependencies and prioritising accordingly
- Encourage iterative development by slicing activities into smaller tasks
- Tracking the progress made and improve accountability
- Gain more insights into the user’s journey and experience with using the product throughout its lifecycle
- Think about and convey better the value a system offers to the team and other stakeholders
Building your First Story Map
Story mapping is an easy process to learn since it uses the same number of steps each time:
- Break down your project into smaller tasks (user stories) and write them onto a card or post-it note
- Arrange the tasks into groups of logical “activities” that are based around similar goals. Write the name of the activity on a differently-coloured card
- Organise each activity in chronological order, either as rows or as columns, and lay them onto a wall or a whiteboard. The activity cards should be at the top of the column or the beginning of the row, and task cards are placed underneath/besides them
- Sort the task cards in order of priority, the more important a task is the higher up the column (or the more to left in the row) it should be
- You can annotate the area around the map with extra information
Prioritising Stories on the Story Map
The way a story map is laid out on the board easily lends itself to a system of prioritisation and workflow management that is based on the spatial arrangement of the cards themselves. The cards located at the top of a map arranged with priority along the y-axis (or the left-hand side if priority is along the x-axis) are the most important and are the ones that should be acted upon in the next sprint. Each row (or column) of cards (“lane” is a catch-all term that can be used for both) theoretically represents a release and the very first row (or column) are the essential items that need to be present in the software for it too work.
The topmost row (or leftmost column) is appropriately called the backbone or spine of the system and it also corresponds to the minimum viable product (MVP). The rows or columns hanging onto the backbone are derivative functionalities that enhance the system’s usefulness overall, and each lane completed adds an additional layer of value to the product and takes it one level higher in its development.
A story map gives you extra flexibility since you can move cards up and down (or left or right) to indicate how critical they are and changing their lanes will also change the sprint when a given user story will be fulfilled in the release plan. A story map can be considered an information radiator which conveys a huge amount of details through a simple visual aid.
Common Story Mapping Pitfalls to Avoid
When creating your first story map, there are some things you should bear in mind to avoid commit common mistakes:
- Making very detailed maps in the early stages
- Writing software features on the stickies rather than user stories and goals
- Mapping the whole product instead of just the specific functionality you’re currently working on or are planning to release
Summary
Story mapping is a great way to slice and dice your project into easily-digestible tasks, while also getting the benefit of and seeing how these individual elements join together to form the spine of your users’ experience with the product as well as how different tasks relate together in terms of priority.
A story map, whether put up on a wall or whiteboard, or created using ReQtest’s agile board for easier sharing with distributed teams, optimises the way you work with user stories, turning disparate tales into a compelling narrative.
You can start story mapping today, all you need are some post-it notes, a marker, and enough space to stick the notes.
If you’re a ReQtest user you can fire up the agile board and start collaborating with your team on your first story map right away, and if that sounds like something you’d like to try too you can activate your 10-day free ReQtest trial here.
Start story mapping with the ReQtest agile board
Share article